
Metal miniatures generally have a bad reputation. They’re expensive, they chip easily, they’re too heavy etc, but the one gripe that seems to be levelled at them more than most is that they can’t be easily converted. Of course working with plastic is no doubt far easier but there are times when you will need to work with metal parts. With a little patience, some time and most importantly, the right tools, it’s not a difficult job. To illustrate this I’m going to take you through the process of creating a ‘counts-as’ Kor’sarro Kahn for my Space Marine army.
Gathering the Components;

The first thing to do, and probably that which represents the hardest job, is deciding on the components you want to use. Kahn’s wargear (power sword and bolt pistol) dictate part of his look so from that starting block, as well as referencing Games-Workshop’s own official Kahn model (which doesn’t fit my theme with the White Scars iconography), a picture can be built up of what he is to look like. For a while I’d looked at the Vanguard Veteran kit searching for an excuse to use them – lovely models, but such a garbage unit in game. The marine with the two-handed relic blade in particular is awesome and so I decided that he’d be the basis for my Kahn. I’d be using his legs and his arms (with relic blade attached) for this project, while the torso, cape and eagle backpack all came from the plastic Space Marine Commander boxset and the head from the Space Wolves Pack kit.
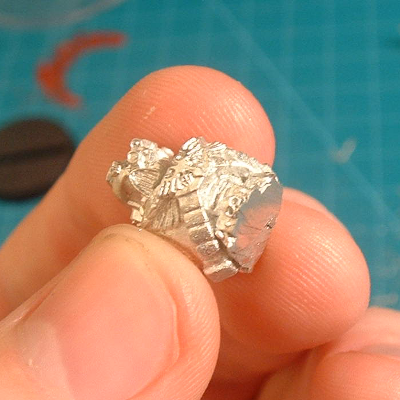
Cutting the Legs;

The Vanguard Vet’s body and legs were one piece, but it had the jump pack harness moulded onto the torso so that would have to go. In order to get nice clean cuts on metal minis using the right tools is essential. A good razor saw, hobby drill, vice, needle files, hobby knife, green stuff, paperclips and super glue are all absolute necessities. Holding the figure in place with the vice (preferably clamped with rubber jaws so it doesn’t damage the sculpt) and carefully cut away the top half using the razor saw. A razor saw’s kerf is extremely narrow so when cut both parts will be perfectly usable and nothing is wasted. It’s even possible to use it to cut detail like panel lines into plasticard or sheet metal. Using the pin vice holes were drilled into the feet and 10mm lengths of straightened paperclips were glued into the holes. A 25mm length was also glued into a hole drilled into the pelvis, serving as a mount for the new torso.
Preparing the Base;
To avoid any balance issues I decided to mount the mini onto a 40mm base. Hopefully that will stop him from toppling forwards. I’m aware the rules state bases should be the size supplied, but the ‘rule-of-cool’ takes precedence here and a larger scenic would look better anyway. To determine where the holes in the base would need to be simply take your prepared legs and apply a dab of paint to the pins protruding from the feet, then position the legs where they will need to be on the base, and it will leave a paint mark in the place where the holes will need to be. Using the paint marks as a guide drill the holes using a 1mm bit and hobby drill. Apply a little superglue to the miniature’s feet, and also the pins themselves and then insert into the base and leave to set. I usually leave this overnight at this stage since you want to make sure it has completely set before you start adding any more weight to it.
Assembling the Torso;

The torso came from the plastic Space Marine Commander kit and is supplied in two parts. After cutting the components from the sprue and cleaning away any mould lines the two halves were then filled with green stuff (plastic putty or milliput would also do here) before being glued together using polystyrene cement. Polystyrene cement, or plastic glue, will form a much stronger bond on plastic to plastic than super glue will as it actually fuses the parts together. The underside ‘bowl’ of the torso, was then also filled with green stuff, creating a flat base to sit on the new legs. Again using a 1mm bit, holes were drilled into each shoulder as well as up all the way through the torso and out the neck hole. Insert the pin from the legs section into the torso and slide it through. The torso should sit nicely on the legs and the pin should protrude slightly through the neck hole. Making sure everything is sat properly, it’s again left to dry.
Attaching the Arms;

Since there will be a fair amount of weight in the arm section leaving the miniature top-heavy it’s important that they’re properly attached. Pin the second hand to the sword handle (the first is already attached) but don’t glue it yet. Drill holes as before into the shoulders and then superglue 10mm pins into place and set aside to dry. When these are dry the arms can finally be attached to the torso. Superglue all the pins in place, including the second hand to the handle.
When pinning joints it is often worth cutting the pins too long and the trimming them down after they’ve been fitted. A number of different things can be used for pinning – florist’s wire, metal rods, heavy staples – even drawing pins. I tend to use paper clips as they appear to be breeding in my office. This baby isn’t going to fall apart!
Final Assembly;
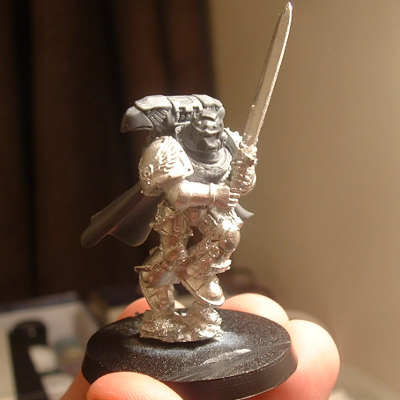
To finish off its simply a case of attaching the backpack to the torso using a little plastic glue (I actually usually leave this part till after painting so I can get access to the cloak properly). The final piece to fit is the head. Drill a 1mm hole into the head to accept the pin and superglue it into place. Although the torso and head are both plastic, the superglue is needed to adhere to the pin giving the entire torso plenty of strength and stability that should stand up to some hard gaming.
All that remains is to get the painting done! So, its evident that its not as easy to convert metal miniatures as it is to alter plastics, but it is possible, and with care and patience its well worth doing. Look out for Kahn and his outflanking Land Raider coming to a gaming table near you soon!
