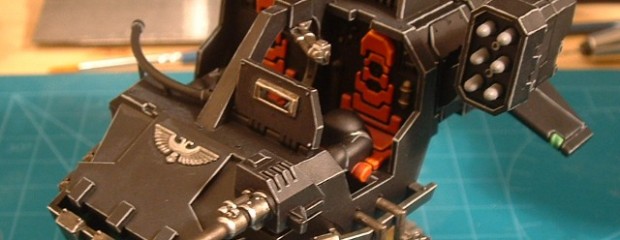
The Land Speeder model has always been a massive favourite if mine despite the fact that I’d never used them on the tabletop. Finally I’ve got round to it and this is the journey of one of my Typhoon-pattern speeder’s progress from plastic to painted. Even though it’s almost identical in appearance to the original 3rd edition plastic kit this new effort is much easier and pleasing to put together. The old kit was a bit of a pig to put together with unwieldy seams and ill-fitting parts but this one is a much more streamlined affair and the parts layout and construction makes far more sense. At last you don’t need three hands to put it together satisfactorily. To put things into perspective the old kits take me around 45 minutes to assemble, while this one takes around 15. Massive, massive difference. The base was magetised as per the tutorial here.

I really hate painting vehicles but I persevered and gave it a black spray followed by a few base coats. This first stage was surprisingly quick on this, helped along the way by copious amounts of coffee and Hob Nob biscuits. The seats got a coat of Mechrite Red, Iyanden Sun for the lights, Codex Grey for the missile tips and the metal areas were done in Boltgun Metal. The control panel console details were painted in using the same colours plus a little Snot Green and Ice Blue. I glued the original flying base onto a 60mm base simply so that it matches the rest of my army. Completely unnecessary but my OCD thinks it adds to the cohesiveness of the army.
This next step took hours (and hours). Sometimes I question what I was thinking when I started this army, particularly that moment lay in the bath where I was thinking that painting stuff black would be easy? I highlighted every single panel edge and recess as per usual with Codex Grey- I even highlighted the Recaro-lookalike seats with a little Blazing Orange despite the fact that they’ll hardly be visible when assembly is complete. I think it’s worth the time and effort although it’s demoralising and fatiguing during the painting. It seems to take forever with no end in sight. All the metal areas were washed with both Devlan Mud and Badab Black before being highlighted with Mithril Silver. The base was built up using railway ballast mixed with PVA glue, before being washed in Devlan Mud and drybrushed with Codex Grey followed by Bleached Bone. A final application of Citadel Scorched Grass finishes it off.

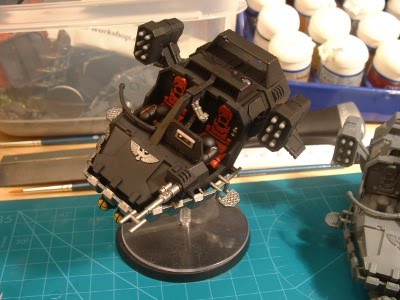
To make things more simple the crew were painted separately, following the same techniques and procedures as the rest of my marines. I must admit I wasn’t truly happy with the model until the pilot and gunner were test fitted. It’s like flicking a switch to ‘ON’ – all of a sudden everything looks ‘right’.

The crew and heavy bolter were removed again and varnished separately using Citadel ‘Ardcoat, while the speeder itself was removed from its base and given a couple of sprays of Vallejo Brilliant Gloss. I prefer spraying tanks and vehicles since the finish is far superior to using a brush.

And there’s the finished Land Speeder. The whole thing took four evenings to complete, although I did a second in just two nights. They really are wonderful models and look awesome on the tabletop, as well as being effective in gaming terms as well. An in depth look at Land Speeder tactics can be found in the first installment of our Chapter Standard here.
